Introduction to Beginner Astrophotography
If you’ve been looking into astrophotography, you’ve probably seen incredibly detailed images of galaxies and nebulae, and just as quickly felt overwhelmed by the equipment required to capture them, and maybe you thought the average beginner astrophotography setup would cost a small fortune.
Here’s the reality:
A beginner astrophotography setup doesn’t need to be complicated, expensive, or even include a telescope! Managing expectations is important, but to get started, you really don’t need much.
In fact, many people get their first successful images using gear they already own. This guide is built around that idea. Instead of pushing you toward expensive equipment, it will show you how different setups actually work in practice, what you can expect from them, and how to choose one that fits your goals.
If you’re new, it’s worth first understanding the basics of astrophotography and its types in this guide.
You’ll also find excellent beginner-friendly breakdowns from sources like Sky at Night Magazine and AstroBackyard, both of which emphasise starting simple and building experience over time.
Start With What You Have
One of the biggest mistakes beginners make is assuming they need to buy everything upfront or overspending on equipment they will outgrow within a few months.
Astrophotography rewards patience and understanding far more than it rewards expensive gear. A stable tripod, a basic camera (or even a smartphone), and a willingness to experiment will take you much further than you might expect.
It’s also worth remembering that upgrading too quickly can actually slow you down. More advanced astrophotography setups introduce more variables, such as tracking accuracy, polar alignment, or guiding, which can become frustrating if you haven’t built a foundation first.
Think of your first setup as something to learn with, not something that has to be perfect.
Types of Astrophotography
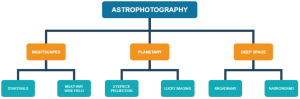
Before choosing equipment, it helps to understand what you’re trying to photograph, because each type of astrophotography favours a different kind of setup.
Wide-Angle Nightscapes
This is the most accessible form of astrophotography. It combines the night sky with foreground elements like landscapes, buildings, or trees. Because you’re capturing a large portion of the sky, a DSLR with a wide lens or a smartphone is ideal.
This is where most people begin, and for good reason. You can produce impressive Milky Way shots without tracking, and the setup is quick enough that you’re more likely to actually go out and use it. Of course, a dark sky is crucial when shooting without tracking. Because you are limited to short exposures (in accordance with the 500 rule or the NPF rule), you will either need to stack multiple short exposure images or shoot from a truly dark sky.
Deep-Sky Astrophotography (DSO)
Deep-sky imaging focuses on objects like nebulae, galaxies, and star clusters. These targets are often faint, which means you need longer exposures and, eventually, some form of tracking. Whilst it is possible to image some bright targets (M31, M33, M42, etc.) without any tracking, you’ll soon find the process of stacking these images quite challenging because of the time it takes and the hard drive space requirements.
One important thing beginners often miss is that many deep-sky objects are surprisingly large in the sky. That’s why shorter focal lengths like camera lenses or small refractors are often better starting points than large telescopes. The added benefit of using these is that with shorter focal lengths (wider field of view), your tracking is much more forgiving, and you can get away with less-than-ideal setups.
Planetary/Lunar Imaging (Lucky Imaging)

Planetary imaging is very different from deep-sky work. Instead of long exposures, you record short, high-frame-rate videos and extract only the sharpest frames. We’re going for quantity over quality here, and we will be discarding up to 75% (or sometimes more!) of the captured frames.
Paradoxically, planets are small targets, so magnification matters more than wide field coverage. This is where long focal length telescopes, such as Newtonian reflectors on a Dobsonian mount (colloquially called “Dobs” or “Light Buckets”), come into their own. Due to their simplicity, a Dob will usually be the most “telescope for your money” that you can get. Skywatcher, StellaLyra and GSO all make good-quality reflectors that are suitable for beginners.
Beginner Astrophotography Setup Options
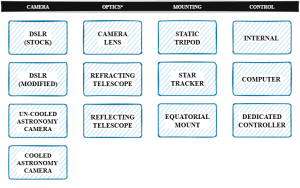
These setups are not strict steps. As you gain experience, you’ll likely move between them or combine elements depending on what you want to capture.
Smartphone + Small Tripod
This is the simplest way to start, and it’s far more capable than many people expect.
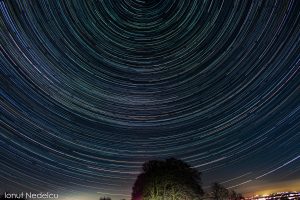
Modern smartphones use wide lenses, which makes them surprisingly effective at capturing the night sky. When mounted on a small tripod, they can produce clean images of constellations, the Milky Way, and even basic star trails with some processing.
The biggest advantage here is accessibility. There’s no complicated setup, no alignment process, and very little to troubleshoot. You can be up and shooting within minutes, which makes a huge difference when you’re just starting.
That said, there are limits. The small sensor struggles with faint detail, and you won’t be capturing deep-sky objects in any meaningful way. But that’s not the point of this setup. It’s about learning composition, exposure, and getting comfortable working in the dark.
For many people, this is where astrophotography becomes enjoyable rather than intimidating.
DSLR + Tripod + Intervalometer
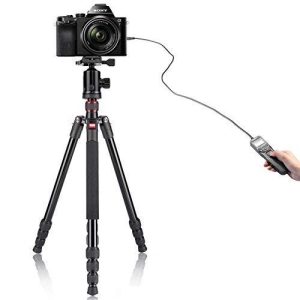
Moving to a DSLR or mirrorless camera opens up a lot more control. You can adjust exposure, ISO, and focus manually, and you can take multiple images to stack later.
This setup is still simple, but it introduces you to the core workflow of astrophotography: shooting a sequence of images and combining them to reduce noise and improve detail.
Wide-angle lenses (typically between 14mm and 35mm) are commonly used here, allowing you to capture large portions of the sky. This makes it ideal for photographing regions like the Milky Way core in Sagittarius or the dense star fields in Cygnus during summer.
The main limitation is Earth’s rotation. Without tracking, your exposure time is restricted before stars begin to trail. This isn’t a major issue for wide-field work, but it does place a ceiling on how much detail you can capture.
Still, this is one of the most balanced and rewarding beginner astrophotography setups available.
Buying advice: A faster lens will capture more light, so if it is within your budget, look at these first. The “Nifty-Fifty” lenses are excellent optically and are quite affordable. It’s also worth looking at third-party manufacturers such as Samyang (Rokinon in the US), Tamron, Sigma, etc. And for the intervalometer, get a wireless one. It adds very little to the cost, and it’s much better to use.
Astro-Modified DSLR and Lens + Star Tracker
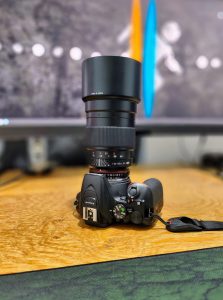
This is where things start to feel more like “real” astrophotography.
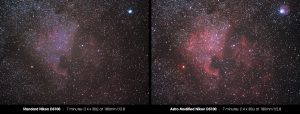
A star tracker allows your camera to follow the motion of the night sky, which means you can take much longer exposures without star trails. This dramatically improves image quality and allows you to capture faint details that would otherwise be lost.
Pairing this with an astro-modified DSLR adds another layer of capability. These cameras are more sensitive to hydrogen-alpha (Ha) light or across the entire spectrum (Full Spectrum Mod), which is emitted by many emission nebulae. As a result, objects like the Orion Nebula (M42) or the North America Nebula (NGC7000) begin to show much more structure and colour. You can now start looking at narrowband filters for your modified camera.
This setup does introduce new challenges. You’ll need to learn basic polar alignment, manage balance, and be mindful of the tracker’s weight limits. But it’s still relatively portable and far less complex than a full telescope setup. Again, using a wider lens is much more forgiving on smaller trackers.
For many beginners, this is the point where astrophotography becomes truly exciting.
Buying advice: You will often find older modified DSLRs on the used market for a fraction of what a new camera will cost. They still have plenty of life left in them and are excellent for portability because they don’t need external power. Canon tend to be the more popular brand, but you can find Nikon or Sony modified cameras as well.
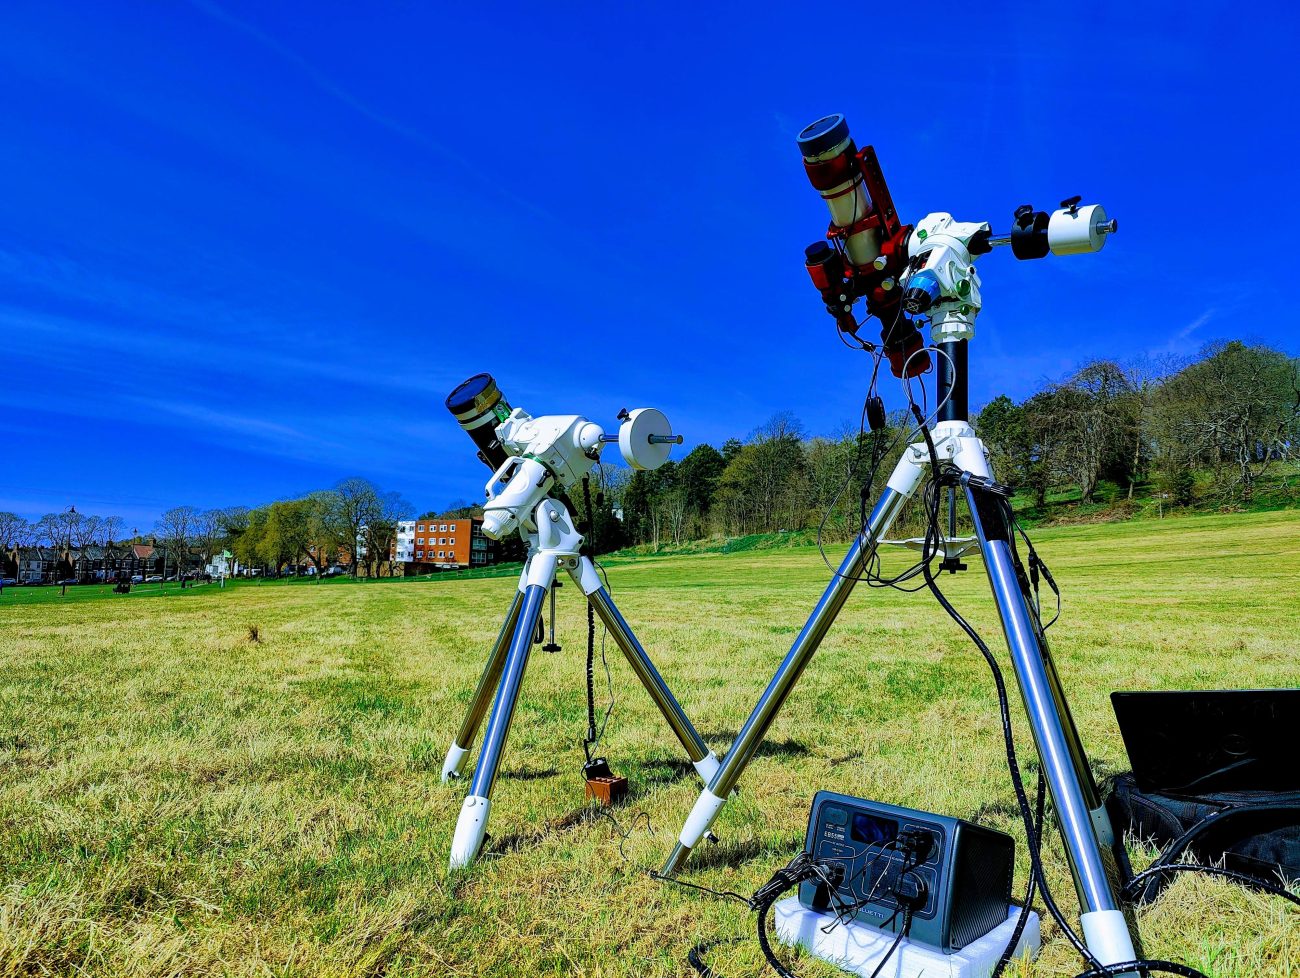
Equatorial Mount + Small Refractor + OSC Camera
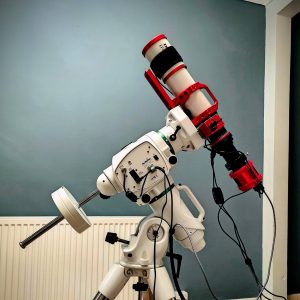
At this stage, you’re moving into a dedicated deep-sky imaging setup. You can call yourself an astrophotography enthusiast.
An equatorial mount tracks the sky with much higher precision than a star tracker, allowing for longer exposures and more consistent results. You will also see a big increase in payload capacity. A small refractor telescope provides a sharp, wide field of view, which is ideal for many beginner-friendly targets.
One-shot colour (OSC) cameras simplify the imaging process by capturing colour data in a single exposure, removing the need for filters and complex processing early on. With that being said, a Luminance filter is sometimes needed, and a Light pollution filter can’t go amiss either. Some examples are:
- ZWO IR/UV Cut – Luminance filter
- Antlia Triband RGB Ultra – Light Pollution Suppression Filter
- Optolong L-Quad – Light Pollution Suppression Filter
- Svbony SV240 – Light Pollution Suppression Filter / Multiband Filter
- Svbony SV220 – Dual Narrowband filter
- Optolong L-eXtreme – Dual Narrowband filter
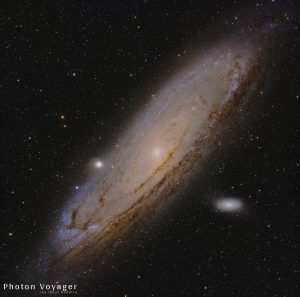
This type of setup is particularly well-suited to objects like the Andromeda Galaxy, the Pleiades (M45), and large emission nebulae. It’s also more forgiving than longer focal length systems, which makes it a popular recommendation for beginners moving into telescope-based astrophotography.
However, it does require more planning. Setup time increases, power becomes a consideration, and you’ll likely start using software like N.I.N.A. to control your equipment.
Some manufacturers to consider in this category are: SkyWatcher, William Optics, Askar, ZWO, StellaMira, and Svbony.
Buying advice: Invest the bulk of your budget in your mount. It is the most important part of the setup. Think of it as the platform that governs what telescopes you later use and how well they capture images. It’s no use to have the best telescope in the world with the best camera if you get elongated stars when you take a 30s sub.
Advanced Setup: Large Telescope + Mono Camera
This is where astrophotography becomes more specialised and significantly more demanding.
Larger telescopes provide greater resolution, which is useful for smaller targets like distant galaxies. Monochrome cameras, combined with broadband and narrowband filters, allow you to capture highly detailed data across different wavelengths.
The trade-off is complexity. Imaging sessions take longer, setup becomes more involved, and processing requires more effort. This type of system is powerful, but it’s not something most beginners need to aim for immediately.
Buying advice: At this point, you should own a very good and sturdy EQ mount. Your next big purchase is a set of quality filters. There’s no going around it: it will sting. Badly. “Buy once, cry once” is a saying often repeated at this stage in astrophotography.
Dobsonian (or Maksutov) + Planetary Camera
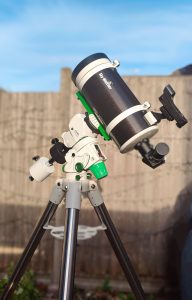
Dobsonian telescopes are often recommended for visual astronomy, but they also have a place in astrophotography, particularly for planetary imaging.
Their long focal lengths make them well-suited to capturing small targets like Jupiter, Saturn, and the Moon. When paired with a planetary camera, you can record high-frame-rate video and process it using a technique known as lucky imaging.
This makes it a surprisingly approachable way to explore a different side of astrophotography because planetary cameras will typically cost significantly less than their cooled, DSO counterparts.
Another good planetary scope to look at is Maksutov Cassegrain (a.k.a. Maks). They’re typically more compact and slower (optically), but offer long focal lengths and don’t require collimation, but they will cost a bit more.
Buying advice: When it comes to Dobs, you can safely go for the largest you can safely move. With telescopes in general, the larger the aperture, the more detail you can resolve. Strictly for planetary work, you’re less interested in “fast” scopes and more interested in focal length.
Control Systems and Software
As your setup grows, manually controlling everything becomes less practical.
Systems like the ZWO ASIAir (closed ecosystem) and ToupTek StellaVita (open ecosystem) offer beginner-friendly ways to automate imaging using a tablet or phone. On the more advanced side, N.I.N.A. running on a Windows Mini PC or laptop is extremely comprehensive (and open-source!), whilst EKOS/KStars are good Raspberry Pi alternatives. These systems provide powerful tools for planning and executing imaging sessions from a laptop or tablet.
Features like plate solving, automated sequencing, and target tracking can significantly improve consistency and reduce frustration, especially during longer sessions.
Buying advice: Do your research before committing to a system, as some will lock you into a specific manufacturer (looking at you, ZWO). And whilst this isn’t necessarily a bad thing because their products are exceptionally good, you should know these details before you spend the money.
What Is the Best Telescope for Astrophotography?
This question comes up constantly, and the answer is always the same:
There isn’t one.
The “best” telescope depends entirely on what you want to photograph and how you plan to approach the hobby. Smaller refractors are often recommended for beginners because they’re easier to use and more forgiving, but that doesn’t make them universally better.
As you progress, you’ll stop asking this question altogether and start looking at it from these points of view: What focal length best suits my target? My stars look bad, is my setup undersampled?
This is something I’ll break down in detail in a dedicated article.
Best Targets for Beginners
Astrophotography is highly seasonal, and choosing the right target makes a huge difference. To begin with, you should look at large, bright targets that are positioned high up in the sky. These quick wins will boost your confidence and keep you going.
Remember that whilst some targets like M81 and M82 are visible year-round, there are others which are seasonal:
Winter
- Orion Nebula (M42)
- Pleiades (M45)
Summer
- Cygnus constellation
- Sagittarius region
Autumn
- Andromeda Galaxy (M31)
- Triangulum Galaxy (M33)
Practical Considerations
Astrophotography isn’t just about gear. There’s a saying in the community that it is 30% Gear, 30% Processing, 30% Planning and 10% Luck. That’s not far from the truth, especially the Planning. There are some things that might not come immediately to mind:
Portability: Can you carry everything comfortably?
Power: Batteries are essential, especially away from your car. In winter, they last less time (only ~70% of their capacity).
Setup: You’ll often be working in the dark, trying not to trip over cables. Get a good, red head torch.
Dew: Moisture can quickly become an issue. You’ll need dew heaters, and they use lots of power.
Time: Even simple setups require planning. One of the most important steps is to plan your evening!
These factors often matter just as much as the equipment itself.
Progression in Astrophotography
These setups aren’t a ladder, they’re tools.
Even experienced astrophotographers return to simpler setups depending on what they want to capture. A wide-field lens might be just as useful as a telescope on a given night.
Hardware is only half the hobby. Processing images is a vast topic that presents its own challenges. Better equipment will give you better images IF you can process them effectively.
FAQs
What is the best beginner astrophotography setup?
- A DSLR with a small star tracker is one of the most balanced starting points.
Can I start without a telescope?
- Yes, many beginners never use one initially.
Is a star tracker necessary?
- No, but it’s one of the most impactful upgrades.
What’s the easiest object to photograph?
- Bright targets, such as the Orion Nebula or Andromeda Galaxy.
How expensive is astrophotography?
- You can start with no additional cost and scale up gradually. But advanced setups cost a lot of money.
Do I need a computer?
- Not at first, but it becomes useful with advanced setups.
Conclusion
| Setup | Cost | Difficulty | Best Use |
| Smartphone | Low | Easy | Nightscapes |
| DSLR | Medium | Easy | Wide-field |
| Star Tracker | Medium | Medium | DSO |
| Refractor | High | Medium | Deep-sky |
| Advanced | Very High | Hard | High detail |
| Dobsonian | Medium | Medium | Planetary |
A beginner astrophotography setup doesn’t need to be perfect; it just needs to get you started.
- Use what you have.
- Learn as you go.
- Upgrade with purpose.
- Prepare to be cold.
That’s how you build both your skills and your setup over time.